Following these instructions carefully ensures a sturdy and secure structure that can accommodate your guests comfortably. Whether you're a first-time tent assembler or have some experience, this guide will provide the necessary information to make the process a breeze. So, let's get started and create a great space for your celebration!
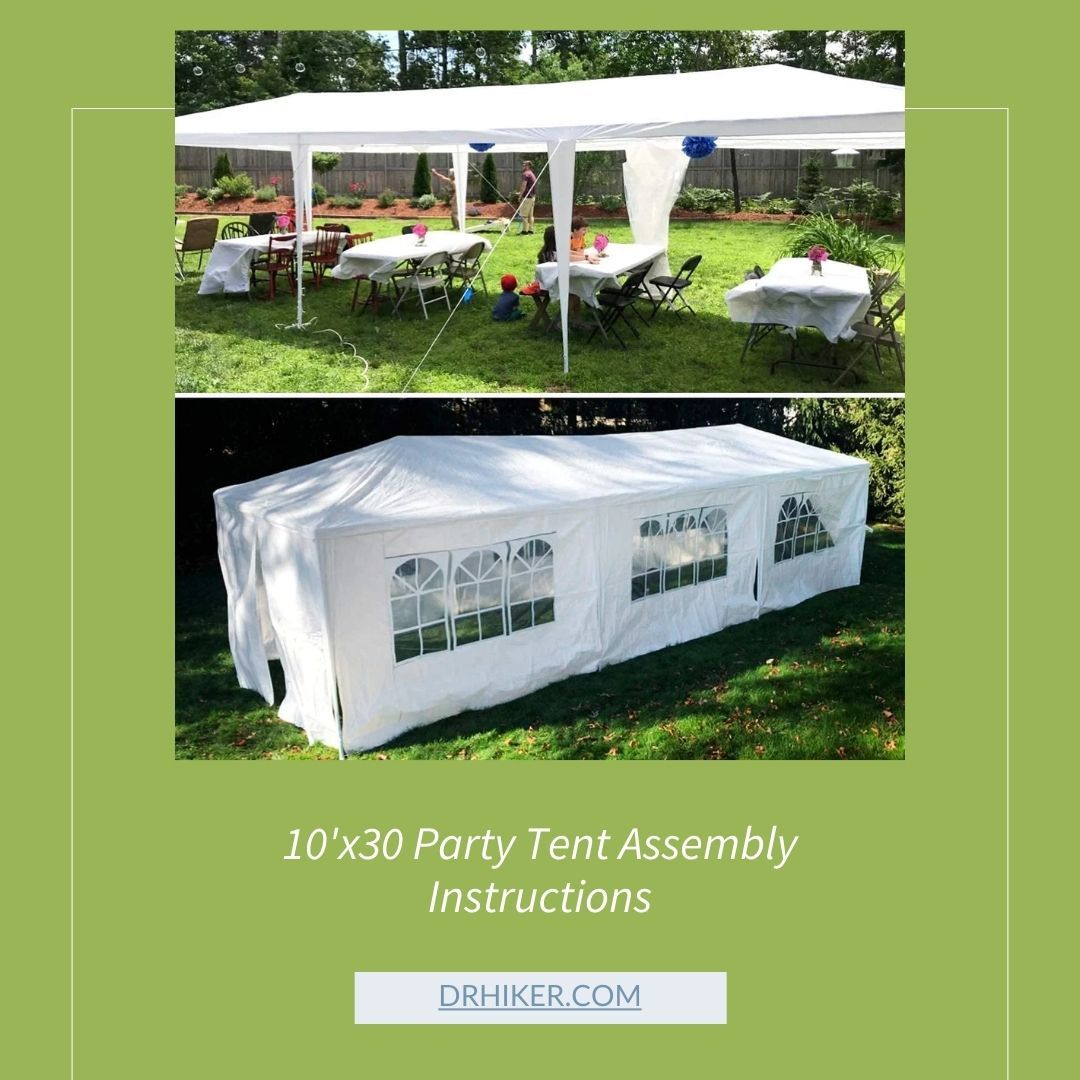
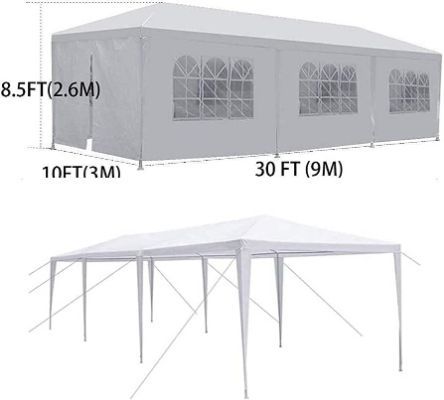
How To Assemble a 10'x30 Party Tent? - PT-1030-8-White Model
By following the assembly instructions carefully and paying attention to detail, you will successfully assemble your 10'x30' party tent PT-1030-8-White model. Remember to refer to the specific instructions provided by the manufacturer for any additional guidance or precautions.
Tools Required for Assembling Party Tent
To assemble your 10'x30' party tent, you will need a few basic tools to ensure a smooth and efficient process. Here are the tools you'll need:
- Rubber Mallet: This will be handy for connecting and securing various tent parts, such as frame joints and stakes.
- Ladder or Step Stool: Depending on the height of your tent, you may need a ladder or step stool to reach certain areas during the assembly process.
- Adjustable Wrench: An adjustable wrench will be useful for tightening bolts and nuts, ensuring a sturdy and stable frame.
- Screwdriver: You may need a screwdriver to tighten screws or secure any additional accessories or sidewalls to the tent frame.
- Scissors or Knife: These tools will be useful for cutting any zip ties, straps, or packaging materials that may be present.
- Gloves: It's always a good idea to wear gloves during assembly to protect your hands and improve grip when handling tent components.
With readily available tools, you'll be well-prepared to assemble your 10'x30' party tent efficiently and effectively.
Pre-Assembly Preparation For Assembling Tent

Before you begin assembling your 10'x30' party tent, it's essential to take some time for pre-assembly preparation. This stage will help ensure a smooth and hassle-free assembly process. Here are the steps involved:
- Unboxing the Tent: Carefully unpack the tent box and lay out all the components. Check them against the parts list provided to ensure everything is included and in good condition.
- Organizing the Components: Sort the tent components according to their types, such as frame poles, canopy fabric, sidewalls, stakes, and accessories. This will make locating and assembling each part easier during the process.
- Familiarizing Yourself with the Instructions: Read through the assembly instructions thoroughly. Familiarize yourself with the diagrams, parts names, and any specific instructions the manufacturer provides.
- Gathering the Necessary Tools: As mentioned earlier, gather the tools required for assembly, such as a rubber mallet, ladder or step stool, adjustable wrench, screwdriver, scissors or knife, and gloves. Having them within reach will save you time and effort during assembly.
Setting Up the Tent Frame
- Lay out the Components: Start by laying out all the frame components on a clean, flat surface. This may include poles, connectors, and other parts specific to your tent model.
- Connect the Frame Poles: Follow the manufacturer's instructions to connect the frame poles. Depending on the design of your tent, this may involve inserting the poles into each other or using fasteners, such as pins or screws, to secure them together.
- Erect the Main Frame Structure: Assemble the main frame structure once the poles are connected. Typically, this involves inserting the poles into the corresponding connectors or brackets. Make sure each pole is fully inserted and engaged with its respective connector.
- Secure the Frame Connections: As you assemble the frame, ensure all connections are properly secured. Double-check that the fasteners, pins, or screws are tightened appropriately. This will provide stability and prevent any wobbling or shifting of the frame.
- Check Alignment and Leveling: Periodically check the alignment and leveling of the frame as you assemble it. Use a level or visually inspect the frame to ensure it is straight and balanced. Making adjustments early on will prevent issues later in the assembly process.
- Follow the Manufacturer's Instructions: It's crucial to follow the specific instructions provided by the manufacturer for your tent model. They may have unique steps or requirements for setting up the frame. Pay attention to any diagrams, labels, or guidelines provided.
Installing the Tent Canopy
- Unfold the Canopy: Unfold the canopy fabric and lay it near the tent frame. Ensure that it is free from any tangles or obstructions.
- Position the Canopy: Carefully position the Canopy over the assembled tent frame. Align it so that the corners and edges of the Canopy match up with the corresponding frame poles.
- Attach the Canopy to the Frame: Start attaching the Canopy to the frame by fastening the provided Velcro straps or clips around the frame poles. Work your way around the tent, securing each connection point.
- Adjust the Tension: Once the Canopy is attached, adjust the tension of the fabric to ensure a smooth and taut appearance. Check for any wrinkles or sagging areas and make necessary adjustments by tightening or loosening the Velcro straps or clips.
- Ensure Proper Alignment: Throughout the installation process, regularly check the alignment of the Canopy to ensure it is centered and evenly positioned on the frame. This will contribute to a neat and professional appearance.
Adding Side Panels and Accessories
- Attach Side Panels: If your tent includes sidewalls, attach them to the frame using the provided fasteners or Velcro straps. Ensure the sidewalls are aligned properly with the frame and securely attached at each connection point.
- Secure the Sidewalls: Once the sidewalls are in place, secure them to the ground using the appropriate attachments. This may involve bungee cords, hooks, loop straps, or other fastening methods provided with your tent. Make sure the sidewalls are taut and free from wrinkles or sagging.
- Install Optional Accessories: If your tent has additional accessories, such as windows, doors, or canopy extensions, follow the manufacturer's instructions. Pay attention to any specific assembly steps or attachment points outlined in the instructions.
Anchoring and Stabilizing the Tent
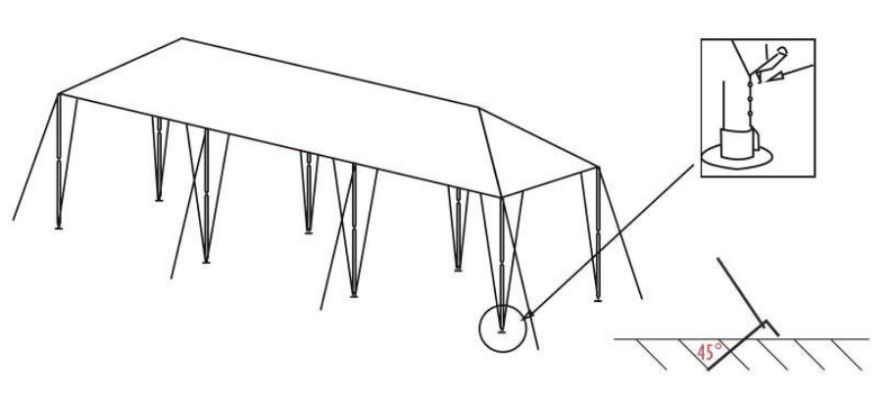
- Choose Anchor Points: Identify appropriate anchor points around the tent's perimeter. These can be stakes driven into the ground or structures used for attachment.
- Secure with Stakes or Weights: Using stakes or weights to secure the tent depends on the surface and ground conditions. Drive stakes through the designated anchor points or use weights such as sandbags or water barrels to provide stability.
- Properly Tension the Tent: Ensure that all anchor points are properly tensioned once anchored. This involves tightening any straps, ropes, or tensioning systems the manufacturer provides. Adequate tension will prevent the tent from shifting or collapsing during use.
Final Inspections and Safety Measures
- Check All Connections: Before considering the tent assembly complete, perform a thorough inspection of all frame connections, fasteners, and anchor points. Ensure that they are securely tightened and properly engaged.
- Verify Stability: Push or shake the tent structure to check for excessive movement or wobbling. A stable tent should remain sturdy and not sway excessively. If needed, reinforce any loose connections or adjust the tension of anchor points.
- Remove Potential Hazards: Scan the area inside and around the tent for any potential hazards, such as sharp objects, low-hanging branches, or uneven ground. Remove or address these hazards to ensure the safety of tent occupants.
- Ensure Proper Ventilation: Adequate ventilation is crucial for a comfortable and safe tent environment. Check that windows or ventilation panels are open or properly positioned to allow for airflow while maintaining protection from the elements.
- Consider Fire Safety: If using heating or cooking devices inside the tent, take necessary precautions to prevent fire hazards. Keep flammable materials away from open flames and ensure proper ventilation for any gas-powered equipment.
- Follow Manufacturer's Safety Guidelines: Refer to the manufacturer's guidelines for specific safety recommendations for your tent model. They may provide additional safety measures or considerations specific to their product.
How to Disassemble and Store A Tent? - Step-By_Step Guide
- Remove Accessories: Remove accessories, such as sidewalls, windows, or doors, from the tent frame. Follow the manufacturer's instructions for detaching and storing these components properly.
- Release Tension: Loosen tensioning systems or straps holding the tent fabric taut. This will make it easier to disassemble the frame and fold the fabric.
- Disassemble the Frame: Start disassembling the frame by reversing the assembly process. Disconnect the poles from their connectors or fasteners, and separate them from each other. Don't force any connections, and handle the frame components gently.
- Fold the Fabric: Carefully fold the tent's fabric with the frame disassembled. Follow the manufacturer's specific folding instructions to ensure a compact and neat fold. Remove any debris or dirt from the fabric before folding, if necessary.
- Pack and Store: Place the folded tent fabric and frame components back into storage bags or containers. Ensure all parts are clean and dry to prevent mold or mildew growth. Store the tent in a cool, dry location away from direct sunlight or extreme temperatures.
- Label and Organize: If you have multiple tents or accessories, consider labeling the storage bags or containers to identify and locate them in the future easily. Keep all related parts and accessories together to avoid confusion when setting up the tent next time.
Before disassembling your tent, we recommend you to clean it thoroughly. In this regard, we provide you with an ultimate guide on How To Clean A Tent With Mold?
Troubleshooting Tips for Tent Assembly and Disassembly
Here are some troubleshooting tips for potential issues you may encounter during tent assembly and disassembly:
Tent Assembling Issues
- Poles not fitting together: If the poles are not fitting together smoothly, check that you have properly aligned the connectors and that the poles are inserted in the correct orientation. Sometimes, applying gentle pressure or rotating the poles can help them slide into place.
- Difficulty stretching the canopy fabric: If you need help achieving proper tension with the canopy fabric, check if the frame is fully assembled and all connections are secure. Adjust the positioning of the Velcro straps or clips to distribute the tension evenly. You may also need to adjust the frame's height or angle to achieve the desired tautness.
- Sidewalls not attaching properly: If the sidewalls are not attaching securely to the frame, double-check that you are using the correct attachment method specified by the manufacturer. Ensure the Velcro straps or clips are aligned with the corresponding attachment points on the sidewalls and the frame.
Tent Disassembling Issues
- Difficulty collapsing the frame: If you're struggling to collapse the frame, ensure you have released all tensioning systems and disconnected any attachments, such as sidewalls. Follow the manufacturer's instructions for collapsing the frame in the correct sequence. Applying gentle pressure or using a partner to assist can make the process easier.
- Folding the tent fabric: If folding the tent fabric proves challenging, refer to the manufacturer's folding instructions, if provided. Start folding from the edges toward the center, ensuring the fabric is smooth and wrinkle-free. Take your time and be patient, as properly folding the fabric will make it easier to store and reduce the risk of damage.
- Difficulty fitting all components in the storage bag: If you need help fitting all the tent components back into the bag, try folding the fabric more compactly or using additional storage containers or bags. Consider using separate bags for the frame poles and fabric to maximize space utilization.
Conclusion
Successfully assembling and disassembling a tent requires careful attention to detail and following the manufacturer's instructions. By addressing potential issues and applying troubleshooting tips, you can ensure a smooth and efficient process, extending the lifespan of your tent and enhancing your overall camping or event experience.